


This page last modified 2012 December 24
Polar Alignment
In order to successfully track an object with a single motion, the polar
(RA) axis of an equatorial mount must be parallel to the axis of rotation of the
Earth. In what follows, it is assumed that the polar and declination axes are
mutually perpendicular and that the optical axis of the telescope and the
declination axis are mutually perpendicular.
There are essentially three
levels of accuracy in polar alignment:
Rough Method
This is the simplest of all, but has the advantage of being rapid and is suitable for visual observing.
- Adjust the altitude of the polar axis so that its angle to the horizontal is equal to your latitude. A plumb-line and protractor is useful for this if there are no suitable markings on the mount.
- Set up the mount so that the polar axis is pointing as nearly north as you can judge.
- Align the telescope parallel to the polar axis of the mount and clamp it in position.
- Sight through the telescope, adjusting the altitude and azimuth of the polar axis until Polaris is centred in the eyepiece.
There is little point in offsetting towards the celestial pole, since it is likely that the error induced by aligning to Polaris will be exceeded by error in judging when the telescope and polar axis are parallel. The telescope will be sufficiently well aligned for visual tracking for shortish periods, but objects will appear to drift in declination.
If you are setting up your telescope somewhere from where Polaris is not visible, you will need to do the following:
- Adjust the altitude of the polar axis so that its angle to the horizontal is equal to your latitude. A plumb-line (or level) and protractor is useful for this if there are no suitable markings on the mount.
- Obtain the difference between magnetic north and true north for your location.
- Use a compass to set your polar axis to true north. Be careful not to let any iron in the mount affect your compass.
- You can also find true north by marking the shadow of a plumb line at true local noon (i.e. sundial noon, or Equation of Time applied to Local Mean Time).
Intermediate Method
This is suitable for mounts with setting circles or polar-alignment scopes, such as bore- scopes. A bore-scope is a small telescope, usually with an illuminated reticle, inside the polar axis of a German equatorial mount. Some other mounts have detachable sighting scopes. For all these, follow the manufacturer's instructions, as the exact method of set-up will be specific to the mount and the alignment scope. The general principle of these alignment scopes is the same: they are exactly parallel to the polar axis and are sighted onto Polaris. The scope either has rotatable reticle or is itself rotatable, and has a marker which is aligned with a sidereal time scale (or local mean time and date scales) on a bezel. Polaris is then centred in the appropriate place in the reticle.
For mounts without alignment scopes, but with setting circles, the method is an enhancement of the Rough Method:
- Level the base of the mount.
- Adjust the altitude of the polar axis so that its angle to the horizontal is equal to your latitude. A plumb-line (or level) and protractor is useful for this if there are no suitable markings on the mount.
- Set up the mount so that the polar axis is pointing as nearly north as you can judge.
- Using the setting circles, set the telescopes to the RA and Dec of Polaris.
- Sight through the telescope, adjusting the altitude and azimuth of the polar axis until Polaris is centred in the eyepiece. Ensure that the base of the mount remains level.
- Once Polaris is sighted, offset to ¾º in the direction of Kochab (beta UMi). If you know the field of view of your eyepiece, this ¾º should be relatively easy to judge accurately.
If you do this carefully, this method should allow long periods of visual observing and will be sufficiently precise for piggy-back photography for up to exposures at least as long as 30 minutes with lenses up to 200mm focal length. It will also allow the setting circles to be used to find objects.
Accurate Method
If you wish to do prime focus photography through your telescope, or if you are setting up the mount permanently, you should take the time to polar align it as accurately as you possibly can. Firstly, align the mount as accurately as you are able, using the appropriate method above. The instructions given are for the northern hemisphere and assume that you have a high-power guiding eyepiece, giving about 200x magnification.
Correct any Index Error of the Declination circle
- Use an eyepiece with cross-hairs or a reticle.
- Select a star close to the meridian, i.e. one whose altitude will not change appreciably for a minute or so.
- With the telescope east of the mount, bring the star to the intersection of the cross- hairs, clamp the Dec axis and read the Dec circle.
- Move the telescope to the west of the mount, bring the star to intersection of the cross-hairs, clamp, and re-read.
- If there is a difference, adjust the index.
- Repeat until there is no index error.
- Repeat on a star of a different declination (difference > 30º).
- If the index or the circle are not moveable, halve the difference between the two declination readings for the same star, and use this as a correction (with the appropriate sign) to future declination readings.
Correct the Altitude of the Polar Axis
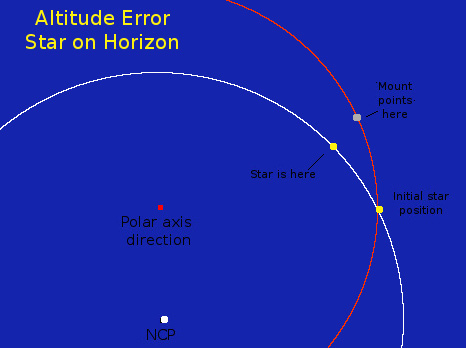
- By trailing a star on the equator and the meridian, orientate the eyepiece reticle markings/cross-hairs so that they run North-South and East-West.
- Choose a star approx. 6h East of the meridian within a few degrees of the equator.
- Bring the star to the intersection of the cross-hairs.
- Clamp the Dec axis and track in RA.
- If the star appears to drift northwards, decrease the elevation of the polar axis.
- If the star appears to drift southwards, increase the elevation of the polar axis.
- Make the necessary adjustments and repeat until there is no discernible drift for at least 5 minutes.
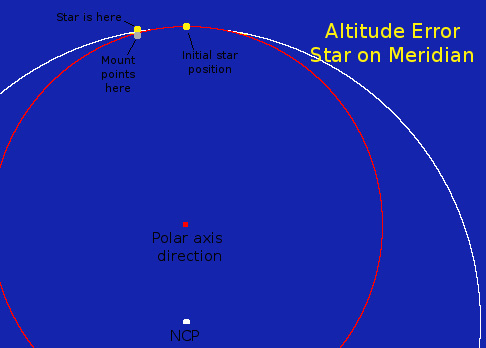
If you try to drift a star near the meridian, drift will be neglegible.
Correct the Azimuth of the Polar Axis
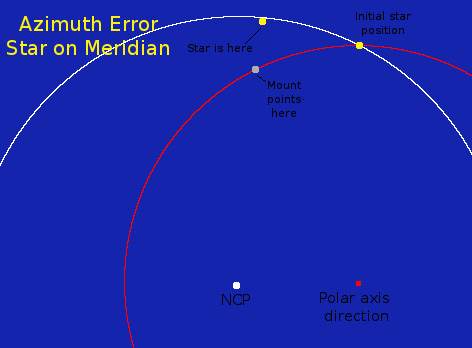
- Choose a star near the meridian within a Dec of about +/- 30°.
- Bring the star to the intersection of the cross-hairs. Clamp the Dec axis and track in RA.
- If the star appears to drift northwards, the polar axis points west of
north.
If the star appears to drift southwards, the polar axis points east of north. - Make the necessary adjustments and repeat until there is no discernible drift for at least 5 minutes.
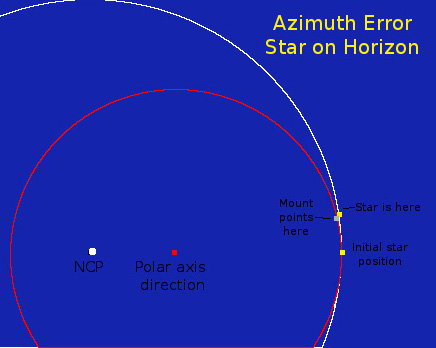
If you try to drift a star near the horizon, drift will be neglegible.
After correcting the azimuth, check the altitude again, and so on until the
mount is properly polar aligned.
NB: For drift alignment, only north-south drift is relevant.
